Originally published 2/24/2020
Hi my lovely sewing friends! It’s been forever and a year since I wrote anything, so I feel this is extremely overdue. I recently got a handful of orders for some Grandpa cardigans and made my kids new jackets. ALL of these items needed buttons. Typically, I’m not super fond of them, but I have found my own little tips/tricks/tweaks that make it a much easier, more consistent task. By the time I was done with my kids’ jackets and moving over to work on the cardigans, I definitely had a greater confidence. By the second cardigan, I felt like I could sew buttonholes and buttons with my eyes closed haha. In this tutorial, I’m going to share my way of sewing both buttons AND buttonholes with my sewing machine. Disclaimer before beginning: I have NO technical training in sewing, so I just do what makes sense and is easier to me. I am also using an automatic buttonhole function on a computerized sewing machine, so writing from that perspective.
So let’s get started. For buttons and buttonholes, I always have chalk or my dual-tip marker (depending on the fabric I’m working with), an acrylic ruler, buttons, scissors, wonder tape, and a hand-sewing needle on hand. You will also need your project completed up to the point where you are ready for installation & your pattern piece for placement.
To get my buttonholes spaced and aligned evenly, I like to use my acrylic ruler and align it with the center of the placket or area the buttonholes are being sewn on. From here, I place a dot in the center of the buttonhole marking. This allow me to make sure that they are vertically aligned. I will also use this dot later for placing my buttons.( I superimposed a red dot over my marker for more visibility.)


At this point, you need to figure out the size of the buttonhole you’ll be making. I have sewn these buttons enough to know that they require a 1″ buttonhole. There are also two important things to figure out right now. 1) What direction does your machine start sewing buttonholes from? 2) What direction will make it easier for you to sew the buttonholes to your item. You will want to place a dot at the spot where you will start sewing your buttonhole. In my example, my buttonhole will be 1″. I placed a dot at the top of the mark in the photo because I prefer to sew my buttonholes with the body to the left of my machine so that only the button placket is in my working space. My machine starts sewing buttonholes from the bottom. Note, I made this mark a different color than my center mark. I do that to not confuse them in the next step.

Install your buttonhole foot on your machine. Place your project under your presser foot and lower it to secure your fabric. Hand lower your needle into the start position (which is the second dot marking you made). Do not confuse it with the middle marking of your buttonhole.
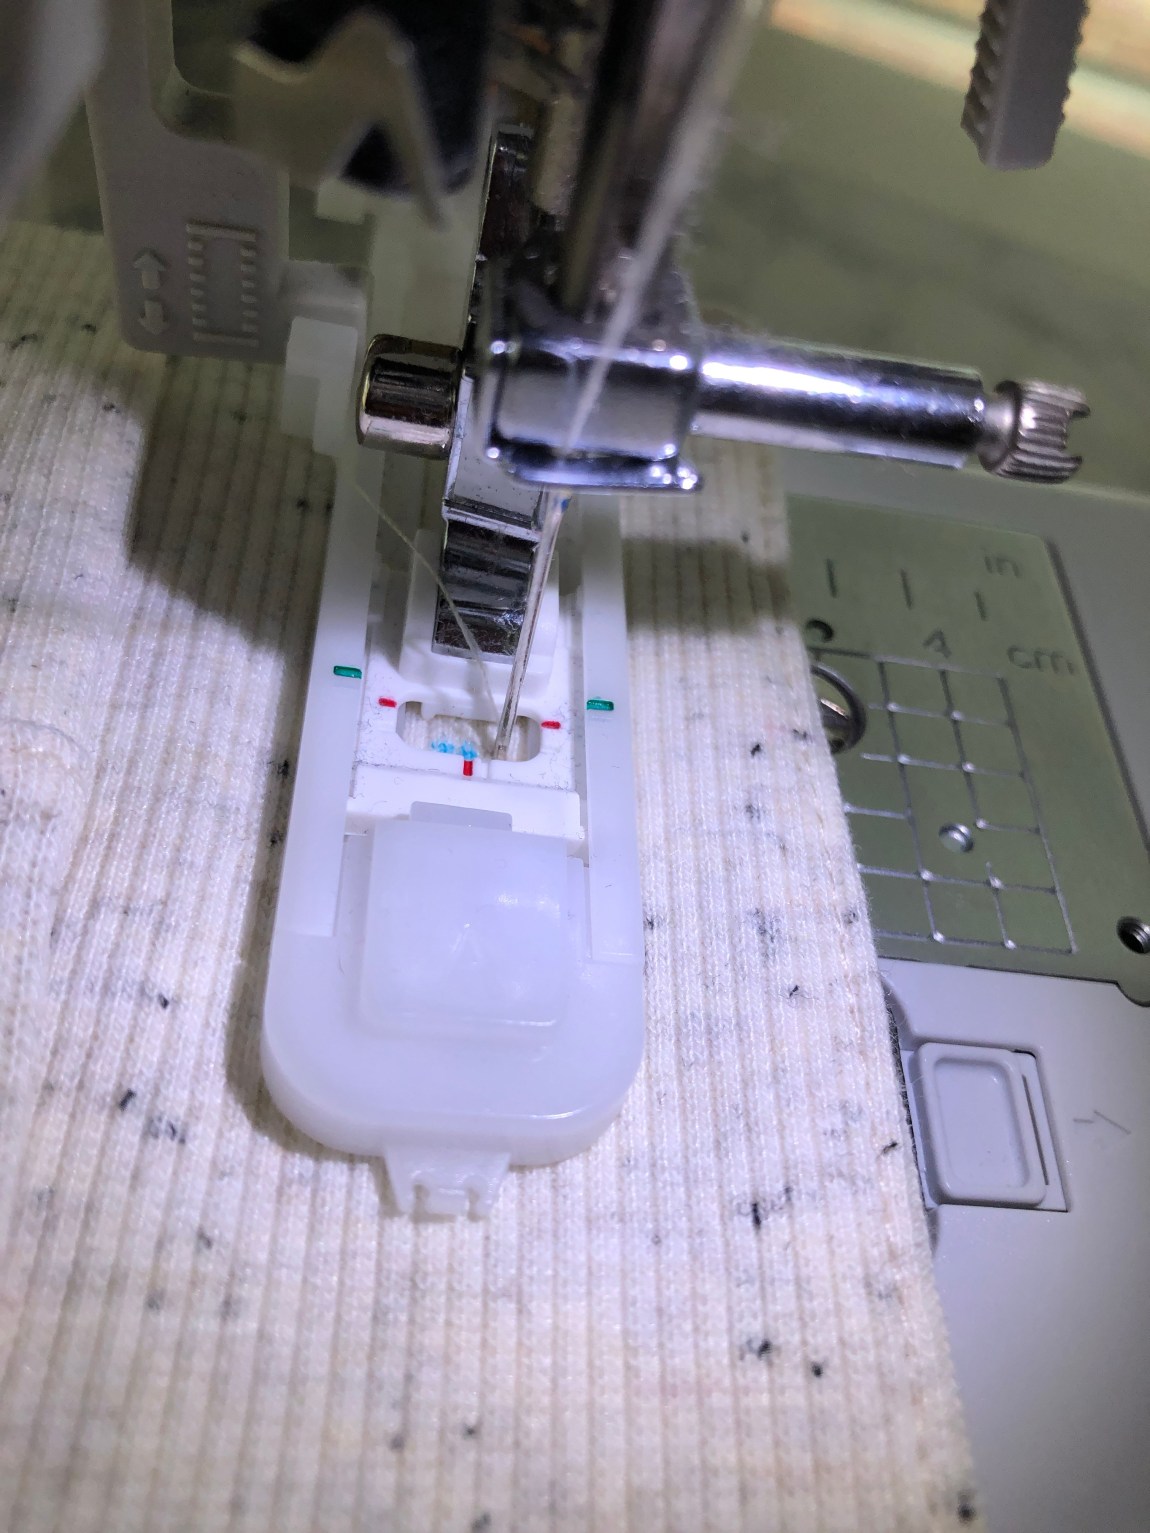
Sew all your buttonholes and admire how aligned they are. You can see that each of mine start at the start mark and you can still see the center point.

To open them up, I insert my seam ripper directly above the bottom stitch and cut through to my middle. I turn my project around and cut in the opposite direction. You are now ready to sew the buttons!!


To place the buttons properly, I overlap my garment exactly how I intend for it to lay after buttoned. Using my center mark from earlier, I mark through the buttonhole onto the other side of the placket where the buttons will be sewn on. I added red dots again because my marker wasn’t super visible in the photos).


This next step is specifically for those who use a sewing machine to attach buttons. It is one of the most helpful things I have personally found for getting my buttons to stay exactly where I want them. In the past, there was a lot of fiddling at the machine as I placed it under the button foot. They would shift, wobble, you name it. No more! I cut tiny strips of washaway wonder tape and place them at the top and bottom of the button. The tape should not cover any of your holes. I have often seen people tape their buttons in place, but the idea of allowing my sewing needles to penetrate adhesive strips doesn’t sit well with me, so this was my compromise. I apply them to the back of all buttons, remove the backing tape, then place them on the center of my button dot. Next, I head back to the machine. (Note, I do not put the final button on in the photos. I wait and do that one at the end individually to make sure placement is optimal when the cardigan is closed.)


Once at the machine, install your button foot and set your machine to a zigzag stitch. Unless you’re familiar with your buttons, as I am, you may need to also adjust your stitch width so that the needle does not break by slamming into the button. To check that the width is correct, place the button centered under the foot, presser foot down, and slowly hand crank the machine so that it does a full “zigzag” by going back and forth. As long as this process is done slowly and the needle does not hit the button, you are all set. If the needle does hit the button, you will need to adjust the stitch width bit by bit until it clears the holes. You may also need to slide the button a bit back or move it forward if the width is enough, but the needle is hitting above or below the holes.


I will admit that this step took me a few garments and lost buttons before I realized the error of my ways. Though it is sooooo tempting to simply trim the threads and move on, the threads are actually not secure. If you pull on one of them, the button will unravel as you pull it. DO NOT CUT THE THREADS!!

Unless you have a fancier, high end sewing machine that finishes buttons for you, you need to secure the threads properly. I am sewing on a computerized Brother, so this is where my experiences are coming from. To secure the buttons, use a hand needle and thread ALL of the top threads to the underside of the buttons. I first separate the threads from the individual sets of holes (top and bottom). I usually just thread them into the hole that’s closest to where the thread is. Once the threads are all pulled through, I separate them again into the individual sets, then tie them in double knots and now I trim away the excess thread.


We are almost done! Remember that tape you applied to the back of your buttons? Now’s a good time to remove it. I just used a pair of tweezers and pick them all off.

Check out how nice the button looks now. No excess threads and no little tails from where they were just snipped off. Repeat the steps for all your buttons. It’s time consuming, I know, but the reward is a nice garment that can be worn without fear of the buttons eventually unraveling and falling off.

Button your garment and you’re all set!

They’re nice, neat, straight, and secure! I love how my Grandpa cardis come out using my methods and feel confident sending these to my customers. I hope you find this helps you with your next set of buttons. I’d also love to hear if there are some even better ways to sew buttons or buttonholes!!
Discover more from Sincerely, Shantelle
Subscribe to get the latest posts sent to your email.


No Comments