Hi, hi, hi! I literally CANNOT believe that I’ve made it to Week 3. I also still cannot believe my look last week placed 1st!! Everyone’s looks were so phenomenal, I was sweating bullets all week waiting for voting to be done. Seriously, beyond excited to be back again. The theme this week is To Dye For (description being: this week, fabricate some looks to die/dye/diy for!) We’re friends, right? Can I just be honest and say I’m literally exhausted with tie dye! I know, I know…it’s all the rage and everyone loves it. I think I have just touched and seen too much of it for the past couple of years (the unopened box of neon tie dye brushed poly in my hall closet is proof). Every store has tie dye this, tie dye that. Also, between you and me, my summertime tie dyes have come out very…..lackluster over the years. I had ZERO enthusiasm to partake in it for a competition. After thinking “tie dye” on a loop, at some point, I dropped the “tie” part and focused on the dye/DIY bit of the theme description. Cue happiness…and the beginning of Pastel Dreams.
My son was my featured model last week, so it was my daughter’s turn for this week’s theme. She is a young, budding artist & often knows what she wants, stylistically, so I knew I needed her input for these looks. She asked for a pastel look, so I sent her a link to Color Hunt and asked her to pick out a couple color palettes that spoke to her. I was already excited because I don’t work with pastel often. I love the soft, dreamy vibe that these colors evoke and knew I could make her Pastel Dreams come true! Think light, airy, flowy, with hints of floral.

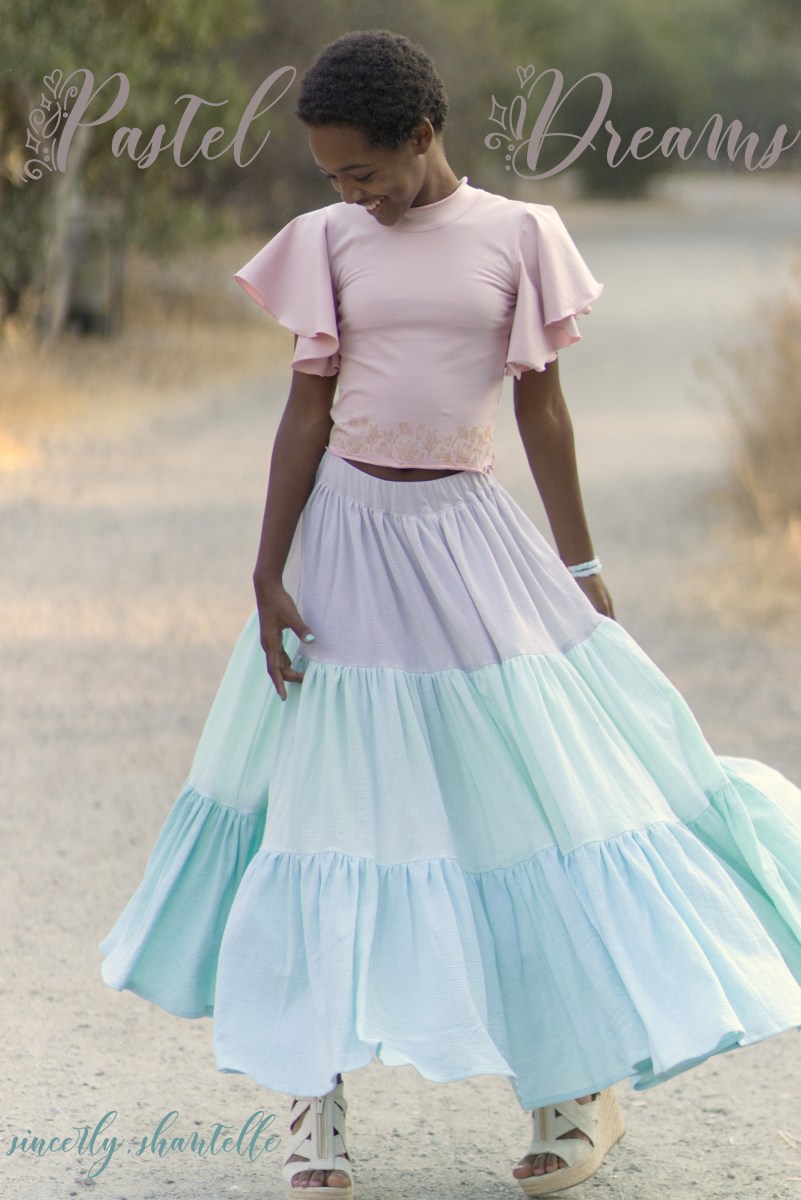
One of my pieces had to be a light, airy piece, which is what inspired the custom dyed gauze maxi skirt! I purchased seven yards of white cotton gauze & three different RIT dyes for it, and hoped for the best. The scariest part was mixing the dye colors and hoping they came out right. I used taupe with a little bit of rose quartz for the tan color, Kelly green for the mint, and teal for the lower blue color. I think I got pretty close!


I created the skirt using measurements. I started with my daughter’s waist measurement -2″ for the waist elastic & used her hip measurement for the waistband. I measured her to decide on overall length, which was 36″. For the top tier, I multiplied her waist by 2.5″ with a height of 10″. For the second tier, I measured the first one by 2.5, with a height of 12″ and for the bottom tier, I multiplied the second tier by 2 with a height of 14.” Y’all….gathering all this almost took me out!! I prefer the two rows of basting stitches method because I feel like I get better control. It took me almost an hour just to gather this whole thing lol! The finished result was 495.25″ worth of gathering (or 13.75 yds) 😳 I knew I wanted it to be full, which is why I chose such a lightweight fabric. It truly, truly worked out!


Going back to her palette, we still had that dusty pink color to accomplish. You may think you saw it in my stack of dyes above. You did…but I will be honest with yall and tell you that fabric ended up being a fail! The color wasn’t quite the right shade (I should have added a little taupe to the dye) but also because the cotton lycra I was dying was thicker than the gauze, even though it was only one yard, I needed a larger container for it to distribute the color better. It came out a little blotchy, and though not super bad, it wasn’t what I was going for. Thankful for the Pale Blush Pink cotton spandex I had in my stash from EmyJean Fabrics, which totally saved the day. To go with the skirt I wanted sleeves that flowed. I made an Iris from Wild Seeds Patterns, a little shorter than the full length, but a little longer than the crop. I wanted to be sure the full effect of the skirt was showing. I also modified the neckline to have a slight mock turtleneck. To keep the look delicate and light, I chose to finish the neckline, hem, and sleeves with a rolled hem. The finishing touch was a little tap into the “DIY” bit of the theme. I purchased a stamp set intended for “scrapbooking.” After coming up with a floral arrangement I was happy with, I used a metallic gold ink to stamp the border around the bottom hem of the shirt. I love, love, LOVE it!


Because the first look was “dressy”, I also wanted a separate casual look for my collection. I grabbed some white jeans from Goodwill, cut some length off the bottom, and used a combo of dipping and brushing to create a very subtle mint ombre for my Mini Mint (my daughter’s nickname to herself). I paired this with a solid white tank top and used some eyelet a sweet sewing friend gifted me a while back to create a lightweight bolero. I modified the Butterfly Cardigan from P4P by sizing up in width only, eliminating a little width around the neckline, and finishing it off with bias tape. When I went to grab some from JoAnn, they didn’t have any that matched the scrap of eyelet. With my newfound confidence at color matching and fabric dyeing, I was able to dye the bias tape to match the eyelet! The dye package actually said that it wasn’t intended for synthetic fibers (the bias tape was poly/cotton) but I was willing to take a chance, and it survived the dyeing AND washing! #winning


Something I hadn’t done yet on Project Run + Play was create an accessory. It’s just not something I typically do, or even think about, to be honest. I will admit I’d become a little inspired by my competitors to dabble in it a little. I used a tutorial on the Ellie and Mac YouTube channel to start making this cell phone purse. I made a couple changes to the construction and I used vinyl for the exterior with cotton lining that was backed with fleece interfacing. I hoped to add a little cushion to it in the event my daughter drops it. I was super happy that my Babylock handled all those layers because I was really nervous that it wouldn’t! I used double strips of vinyl for the straps, magnetic closure, and added this gorgeous gold rose button for a little decor. It may or may not be covering up a tiny boo boo I made with a Sharpie and couldn’t get out 🤫 I also made the bracelet that she’s wearing by braiding some leftover scraps of gauze, and attaching hardware to it. I had actually already braided a long piece before even knowing what I’d do with it, then came across this blog post on how to attach the hardware. It was incredibly easy and turned out really cute. I can see these both getting a lot of use!


So that’s it for this week! I hope you enjoyed reading through this post and checking out the photos. Again, I’d love if you’d vote for Pastel Dreams to get us to the final week! See ya!


No Comments